Pirates of the Caribbean At World's End: Misja 7 - Pearl Vs Kraken (2)
Aktualizacja:
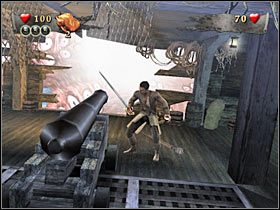
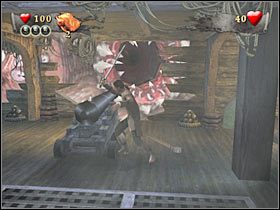
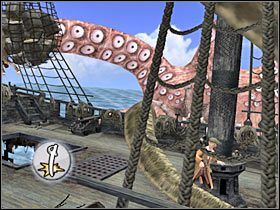
Teraz musisz zaczekać na właściwy moment do oddania strzału. Paszcza ośmiornicy musi się znajdować na wprost od armaty. Usłyszysz charakterystyczny ryk. Skorzystaj z armaty (#1), a potwór powinien stracić 30 punktów zdrowia. Ruszaj w prawo. Identycznie będziesz musiał postąpić z drugą armatą (#2). Zacznij więc atakować macki ośmiornicy, stojąc na lewo od armaty.
 | 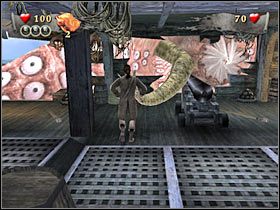 |
Musisz oczywiście atakować macki ośmiornicy (#1), tak aby nie mogła ona porwać marynarza. Nie tylko uniemożliwiłoby to wykonanie jednego z subquestów, ale i wydłużyłoby całą walkę. Po zakończeniu operacji przygotowywania armaty do oddania strzału, będziesz oczywiście musiał z niej skorzystać (#2). Ponownie zaczekaj na właściwy moment!
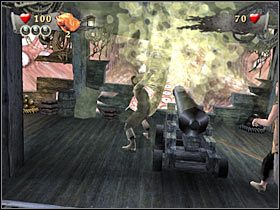 |  |
Czynności te będziesz musiał powtórzyć jeszcze tylko jeden raz. Taktyka walki nie ulegnie oczywiście żadnym zmianom. Odpieraj więc ataki potwora, a we właściwym momencie skorzystaj z armaty (#1). Nie będziesz się już też musiał martwić o marynarzy. Po chwili załączy się nowa scenka przerywnikowa, w wyniku której główny bohater wyląduje w nowym miejscu (#2).
 |  |
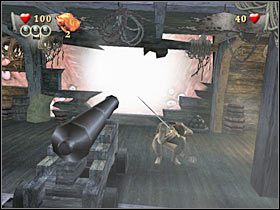
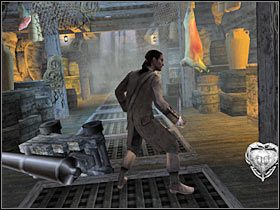
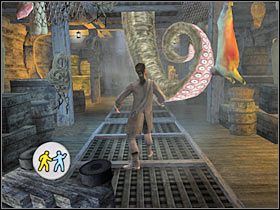
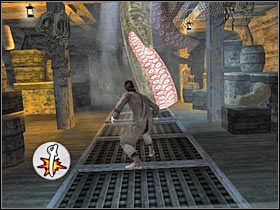
Na początek będziesz musiał zniszczyć skrzynię, tak aby móc podnieść ostatni już, czwarty wisiorek (#1). Ruszaj przed siebie. Po chwili załączy się interaktywna scenka przerywnikowa (#2). Nie jest ona zbyt trudna. Ponadto nawet jeśli się pomylisz, będziesz ją mógł bez żadnych problemów powtórzyć.
 |  |
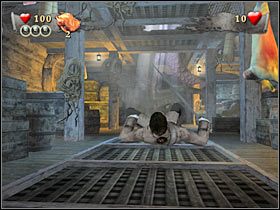
Ruszaj dalej. Po raz drugi będziesz musiał unikać macek ośmiornicy (#1). Scenka ta niewiele różni się od poprzedniej. Podejdź do oznaczonego przez grę punktu i wciśnij klawisz akcji (#2), dzięki czemu będziesz mógł przejść do ostatniej, najkrótszej części tego etapu.
 | 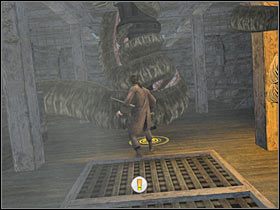 |
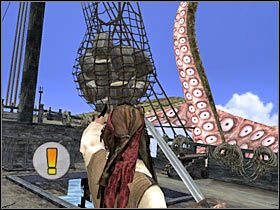
Tym razem czekają cię dwie interaktywne scenki przerywnikowe. Najpierw wcielisz się w postać Miss Elizabeth, a Twoim zadaniem będzie unikanie ataków ośmiornicy (#1). Następnie, przy użyciu pistoletu Jacka, doprowadzisz do efektownej eksplozji (#2), która będzie równoznaczna z zakończeniem tej stosunkowo krótkiej misji.
 |  |
Tym razem będziesz musiał wykonać standardową liczbę wyzwań, tj. trzy. Tryb Duelling uaktywni się dopiero po zakończeniu kolejnego poziomu kampanii (plansza Singapore).
Combat Challenge
Założenia misji: Pokonać 30 wrogów w ciągu 4 minut.
Wskazówki: Zadanie to nie jest jakieś szczególnie trudne, choć będziesz musiał oczywiście sprawnie pokonywać pojawiające się w okolicy potwory. Bardzo przydatne okażą się tu też bombki, a to dlatego, iż plansza, na której prowadzisz walki jest bardzo wąska. Wymierzenie w grupę przeciwników okazuje się więc być bardzo proste.
Combo Challenge
Założenia misji: Wykonać Combo x25.
Wskazówki: Na wykonanie zadania masz 3 i pół minuty. Niestety, jest ono stosunkowo trudne. Głównym ograniczeniem jest bardzo małe pole działania. W rezultacie musisz liczyć się z możliwością występowania celnych kontr ze strony przeciwników. Radziłbym koncentrować się głównie na najsilniejszych atakach, tak aby jednocześnie zabijać lub ogłuszać co najmniej dwóch przeciwników.
Loot Challenge
Założenia misji: Uzbierać 400 sztuk złota.
Wskazówki: Na wykonanie tej misji masz 4 minuty. To wystarczająco dużo czasu, tak więc nie będziesz się musiał jakoś specjalnie starać. Także sama mapa jest zdecydowanie większa, dzięki czemu będziesz sobie mógł pozwolić na dość sporą swobodę działania.

- Piraci z Karaibów: Na Krańcu Świata - poradnik do gry
- Piraci z Karaibów: Na Krańcu Świata - poradnik do gry
- Pirates of the Caribbean At World's End: Solucja
- Pirates of the Caribbean At World's End: Misja 1 - Prison Fortress - Subquesty
- Pirates of the Caribbean At World's End: Misja 1 - Prison Fortress (1)
- Pirates of the Caribbean At World's End: Misja 1 - Prison Fortress (2)
- Pirates of the Caribbean At World's End: Misja 1 - Prison Fortress (3)
- Pirates of the Caribbean At World's End: Misja 2 - Isla de Pelegostos - Subquesty
- Pirates of the Caribbean At World's End: Misja 2 - Isla de Pelegostos (1)
- Pirates of the Caribbean At World's End: Misja 2 - Isla de Pelegostos (2)
- Pirates of the Caribbean At World's End: Misja 2 - Isla de Pelegostos (3)
- Pirates of the Caribbean At World's End: Misja 3 - Port Royal - Subquesty
- Pirates of the Caribbean At World's End: Misja 3 - Port Royal (1)
- Pirates of the Caribbean At World's End: Misja 3 - Port Royal (2)
- Pirates of the Caribbean At World's End: Misja 3 - Port Royal (3)
- Pirates of the Caribbean At World's End: Misja 4 - Pearl Vs Dutchman - Subquesty
- Pirates of the Caribbean At World's End: Misja 4 - Pearl Vs Dutchman (1)
- Pirates of the Caribbean At World's End: Misja 4 - Pearl Vs Dutchman (2)
- Pirates of the Caribbean At World's End: Misja 4 - Pearl Vs Dutchman (3)
- Pirates of the Caribbean At World's End: Misja 5 - Tortuga - Subquesty
- Pirates of the Caribbean At World's End: Misja 5 - Tortuga (1)
- Pirates of the Caribbean At World's End: Misja 5 - Tortuga (2)
- Pirates of the Caribbean At World's End: Misja 5 - Tortuga (3)
- Pirates of the Caribbean At World's End: Misja 5 - Tortuga (4)
- Pirates of the Caribbean At World's End: Misja 6 - Isla Cruces - Subquesty
- Pirates of the Caribbean At World's End: Misja 6 - Isla Cruces (1)
- Pirates of the Caribbean At World's End: Misja 6 - Isla Cruces (2)
- Pirates of the Caribbean At World's End: Misja 6 - Isla Cruces (3)
- Pirates of the Caribbean At World's End: Misja 7 - Pearl Vs Kraken - Subquesty
- Pirates of the Caribbean At World's End: Misja 7 - Pearl Vs Kraken (1)
- Pirates of the Caribbean At World's End: Misja 7 - Pearl Vs Kraken (2)
- Pirates of the Caribbean At World's End: Misja 8 - Singapore - Subquesty
- Pirates of the Caribbean At World's End: Misja 8 - Singapore (1)
- Pirates of the Caribbean At World's End: Misja 8 - Singapore (2)
- Pirates of the Caribbean At World's End: Misja 8 - Singapore (3)
- Pirates of the Caribbean At World's End: Misja 9 - Davy Jones' Locker - Subquesty
- Pirates of the Caribbean At World's End: Misja 9 - Davy Jones' Locker (1)
- Pirates of the Caribbean At World's End: Misja 9 - Davy Jones' Locker (2)
- Pirates of the Caribbean At World's End: Misja 9 - Davy Jones' Locker (3)
- Pirates of the Caribbean At World's End: Misja 10 - Sea Battle - Subquesty
- Pirates of the Caribbean At World's End: Misja 10 - Sea Battle (1)
- Pirates of the Caribbean At World's End: Misja 10 - Sea Battle (2)
- Pirates of the Caribbean At World's End: Misja 10 - Sea Battle (3)
- Pirates of the Caribbean At World's End: Misja 11 - Shipwreck City - Subquesty
- Pirates of the Caribbean At World's End: Misja 11 - Shipwreck City (1)
- Pirates of the Caribbean At World's End: Misja 11 - Shipwreck City (2)
- Pirates of the Caribbean At World's End: Misja 11 - Shipwreck City (3)
- Pirates of the Caribbean At World's End: Misja 11 - Shipwreck City (4)
- Pirates of the Caribbean At World's End: Misja 12 - Maelstrom - Subquesty
- Pirates of the Caribbean At World's End: Misja 12 - Maelstrom - (1)
- Pirates of the Caribbean At World's End: Misja 12 - Maelstrom - (2)
- Pirates of the Caribbean At World's End: Misja 12 - Maelstrom - (3)
- Pirates of the Caribbean At World's End: Solucja
- Piraci z Karaibów: Na Krańcu Świata - poradnik do gry
Komentarze czytelników

ach 3 dni się męczyłem żeby znaleść dojście do wodospadu
I takie poradniki lubię... Zresztą "Stranger" robi NAJLEPSZE poradniki!!! Pozdrowienia dla niego! ;)
Zabrania się kopiowanie jakichkolwiek obrazków, tekstów lub informacji zawartych na tej stronie. Strona nie jest powiązana i/lub wspierana przez twórców ani wydawców. Wszystkie loga i obrazki są objęte prawami autorskimi należącymi do ich twórców.
Copyright © 2000 - 2026 Webedia Polska SA wszelkie prawa zastrzeżone.