Pirates of the Caribbean At World's End: Misja 11 - Shipwreck City (1)
Aktualizacja:
Dokładny opis przejścia misji:
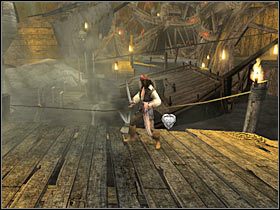
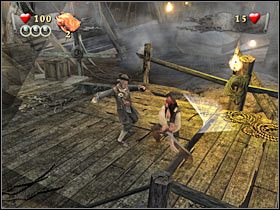
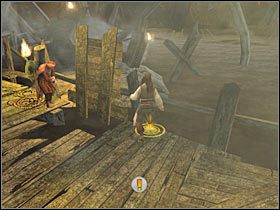
Po obejrzeniu krótkiego filmiku przerywnikowego (#1), w trakcie trwania którego bohaterowie zaplanują dalsze działania, oraz po nacieszeniu się ładnie wykonanym tłem, będziesz mógł przystąpić do właściwej rozgrywki. Na początek pokierujemy postacią Jacka. Zniszcz znajdujące się tu skrzynie, a będziesz mógł podnieść pierwszy wisiorek (#2). Do znalezienia masz jeszcze cztery takie obiekty (wyjątkowo w sumie jest ich 5).
 |  |
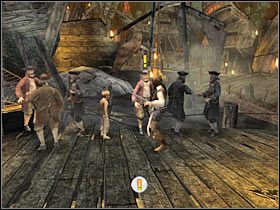
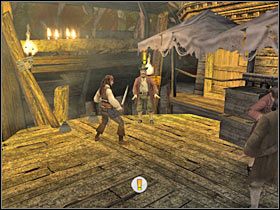
Skieruj się w lewo. Porozmawiaj z piratem, nad głową którego znajduje się charakterystyczny wykrzyknik (#1). Musisz wybierać prawidłowe kwestie dialogową - drugą i pierwszą. Możesz iść dalej. Przemieszczaj się cały czas w lewo. Kolejnych piratów (#2) chwilowo zignoruj, gdyż nie będziesz mógł od nich wyciągnąć żadnych pożytecznych informacji. Ruszaj w lewo.
 | 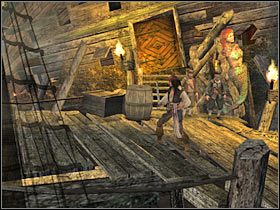 |
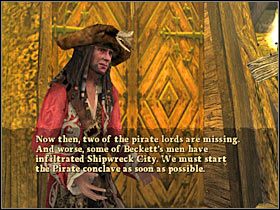
Gdy tylko zbliżysz się do nieco większej bramy, załączy się krótka scenka przerywnikowa (#1). Dowiesz się, że brakuje jeszcze dwóch Pirate Lordów. Zostali oni najprawdopodobniej porwani, tak więc będziesz musiał zająć się ich odnalezieniem. Zniszcz pobliskie skrzynie, dzięki czemu będziesz mógł podnieść drugi wisiorek (#2).
 | 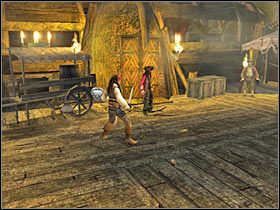 |
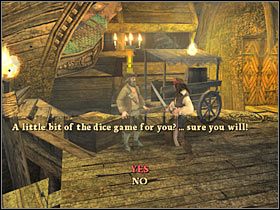
W miejscu tym będziesz mógł zaliczyć dwa subquesty z listy. Jeśli chcesz spróbować swych sił w grze w pokera, porozmawiaj z gostkiem stojącym po prawej stronie (#1). Pirat znajdujący się na lewo od bramy organizuje z kolei grę w kości (#2). Jeśli chcesz od razu przystąpić do głównej misji, skieruj się w stronę jedynej możliwej ścieżki, znajdującej się po lewej stronie.
 |  |
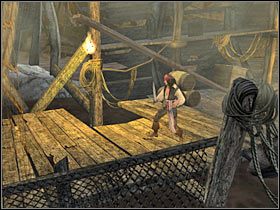
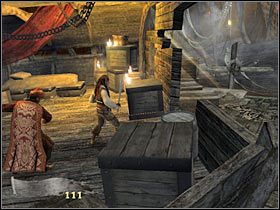
Biegnij cały czas w lewo (#1). Nie odnajdziesz tu niestety żadnych skrzyń, tak więc nie musisz zatrzymywać się. Dotrzesz w końcu do miejsca, w którym załączy się stosunkowo długa scenka przerywnikowa. W rezultacie będziesz musiał zająć się gostkiem pilnującym jednego z Pirate Lordów. Jest on standardowym minibossem. Proponowałbym więc wybrać silniejsze ataki (#2). Kilka takich akcji i będziesz miał ten problem z głowy.
 |  |
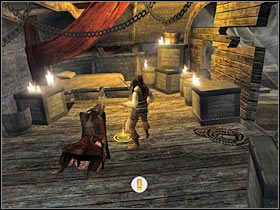
Zniszcz skrzynię i wejdź do środka. Po zbadaniu pomieszczenia podejdź do krzesła i wciśnij klawisz akcji (#1), dzięki czemu Jack w zabawny sposób zrzuci na ziemię pijanego Pirate Lorda. Wysłuchaj krótkiego dialogu. Teraz będziesz musiał odeskortować tego mężczyznę do dużej bramy (#2). Jak się zapewne domyślasz, po drodze zostaniecie zaatakowani przez kilka grup świetnie wyszkolonych najemników.
 |  |
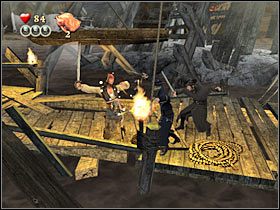
Biegnij z przodu. Podstawowe utrudnienie polega na tym, że na pokonanie najemników będziesz maił jedynie kilkanaście sekund. Pijany pirat po dotarciu do jednej z przeszkód może bowiem wpaść do wody. Pierwsza grupa pojawi się w ukazanym na screenie miejscu (#1). Po pokonaniu przeciwników skorzystaj z klawisza akcji (#2), tak aby umożliwić pijanemu Pirate Lordowi przejście na drugą stronę.
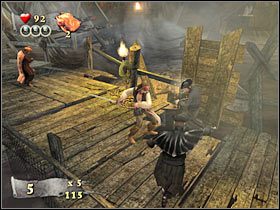 |  |
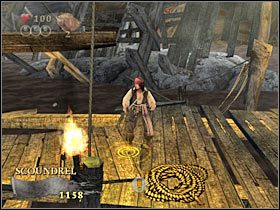
Druga grupa pojawi się oczywiście przy kolejnym niekompletnym fragmencie ścieżki (#1). Tym razem będziesz miał jeszcze mniej czasu na pokonanie przeciwników. Koncentruj się więc głównie na wykonywaniu ataków specjalnych. Po rozprawieniu się z najemnikami szybko podbiegnij do ukazanego miejsca i wciśnij klawisz akcji (#2).
 |  |

- Piraci z Karaibów: Na Krańcu Świata - poradnik do gry
- Piraci z Karaibów: Na Krańcu Świata - poradnik do gry
- Pirates of the Caribbean At World's End: Solucja
- Pirates of the Caribbean At World's End: Misja 1 - Prison Fortress - Subquesty
- Pirates of the Caribbean At World's End: Misja 1 - Prison Fortress (1)
- Pirates of the Caribbean At World's End: Misja 1 - Prison Fortress (2)
- Pirates of the Caribbean At World's End: Misja 1 - Prison Fortress (3)
- Pirates of the Caribbean At World's End: Misja 2 - Isla de Pelegostos - Subquesty
- Pirates of the Caribbean At World's End: Misja 2 - Isla de Pelegostos (1)
- Pirates of the Caribbean At World's End: Misja 2 - Isla de Pelegostos (2)
- Pirates of the Caribbean At World's End: Misja 2 - Isla de Pelegostos (3)
- Pirates of the Caribbean At World's End: Misja 3 - Port Royal - Subquesty
- Pirates of the Caribbean At World's End: Misja 3 - Port Royal (1)
- Pirates of the Caribbean At World's End: Misja 3 - Port Royal (2)
- Pirates of the Caribbean At World's End: Misja 3 - Port Royal (3)
- Pirates of the Caribbean At World's End: Misja 4 - Pearl Vs Dutchman - Subquesty
- Pirates of the Caribbean At World's End: Misja 4 - Pearl Vs Dutchman (1)
- Pirates of the Caribbean At World's End: Misja 4 - Pearl Vs Dutchman (2)
- Pirates of the Caribbean At World's End: Misja 4 - Pearl Vs Dutchman (3)
- Pirates of the Caribbean At World's End: Misja 5 - Tortuga - Subquesty
- Pirates of the Caribbean At World's End: Misja 5 - Tortuga (1)
- Pirates of the Caribbean At World's End: Misja 5 - Tortuga (2)
- Pirates of the Caribbean At World's End: Misja 5 - Tortuga (3)
- Pirates of the Caribbean At World's End: Misja 5 - Tortuga (4)
- Pirates of the Caribbean At World's End: Misja 6 - Isla Cruces - Subquesty
- Pirates of the Caribbean At World's End: Misja 6 - Isla Cruces (1)
- Pirates of the Caribbean At World's End: Misja 6 - Isla Cruces (2)
- Pirates of the Caribbean At World's End: Misja 6 - Isla Cruces (3)
- Pirates of the Caribbean At World's End: Misja 7 - Pearl Vs Kraken - Subquesty
- Pirates of the Caribbean At World's End: Misja 7 - Pearl Vs Kraken (1)
- Pirates of the Caribbean At World's End: Misja 7 - Pearl Vs Kraken (2)
- Pirates of the Caribbean At World's End: Misja 8 - Singapore - Subquesty
- Pirates of the Caribbean At World's End: Misja 8 - Singapore (1)
- Pirates of the Caribbean At World's End: Misja 8 - Singapore (2)
- Pirates of the Caribbean At World's End: Misja 8 - Singapore (3)
- Pirates of the Caribbean At World's End: Misja 9 - Davy Jones' Locker - Subquesty
- Pirates of the Caribbean At World's End: Misja 9 - Davy Jones' Locker (1)
- Pirates of the Caribbean At World's End: Misja 9 - Davy Jones' Locker (2)
- Pirates of the Caribbean At World's End: Misja 9 - Davy Jones' Locker (3)
- Pirates of the Caribbean At World's End: Misja 10 - Sea Battle - Subquesty
- Pirates of the Caribbean At World's End: Misja 10 - Sea Battle (1)
- Pirates of the Caribbean At World's End: Misja 10 - Sea Battle (2)
- Pirates of the Caribbean At World's End: Misja 10 - Sea Battle (3)
- Pirates of the Caribbean At World's End: Misja 11 - Shipwreck City - Subquesty
- Pirates of the Caribbean At World's End: Misja 11 - Shipwreck City (1)
- Pirates of the Caribbean At World's End: Misja 11 - Shipwreck City (2)
- Pirates of the Caribbean At World's End: Misja 11 - Shipwreck City (3)
- Pirates of the Caribbean At World's End: Misja 11 - Shipwreck City (4)
- Pirates of the Caribbean At World's End: Misja 12 - Maelstrom - Subquesty
- Pirates of the Caribbean At World's End: Misja 12 - Maelstrom - (1)
- Pirates of the Caribbean At World's End: Misja 12 - Maelstrom - (2)
- Pirates of the Caribbean At World's End: Misja 12 - Maelstrom - (3)
- Pirates of the Caribbean At World's End: Solucja
- Piraci z Karaibów: Na Krańcu Świata - poradnik do gry
Komentarze czytelników

ach 3 dni się męczyłem żeby znaleść dojście do wodospadu
I takie poradniki lubię... Zresztą "Stranger" robi NAJLEPSZE poradniki!!! Pozdrowienia dla niego! ;)
Zabrania się kopiowanie jakichkolwiek obrazków, tekstów lub informacji zawartych na tej stronie. Strona nie jest powiązana i/lub wspierana przez twórców ani wydawców. Wszystkie loga i obrazki są objęte prawami autorskimi należącymi do ich twórców.
Copyright © 2000 - 2026 Webedia Polska SA wszelkie prawa zastrzeżone.