


Kingdoms of Amalur Reckoning: The Hollowlands (1)
Aktualizacja:
The Hollowlands
M3 - The Hollowlands
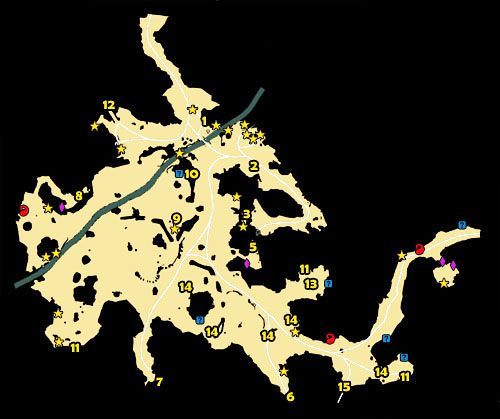
1 - Motus Mining Outpost
2 - Enser Garrou
3 - Canyon Hill Mine
4 - Aurenda
5 - Shadowthorn
6 - Duneshead Mine
7 - Saltwell Caverns
8 - Overlook Camp
9 - Światło Aurendy
10 - Calovar
11 - Century Flower
12 - Aron Excavations Mine
13 - Bloodbane
14 - Szalony górnik
15 - Cloudrest Passage
Fae at the Mine
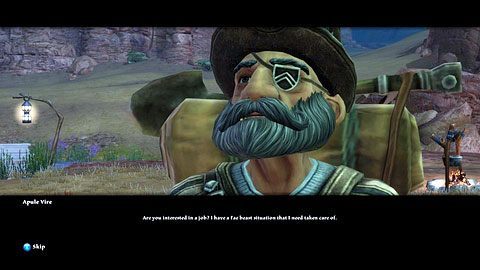
Przed wejściem do Motus Mining Outpost M3(1) porozmawiaj z Apulem Vire. Gnom poprosi cię o odszukanie jego znajomego Ensera.
Zostało jeszcze 69% zawartości tej strony, której nie widzisz w tej chwili ...
... pozostała treść tej strony oraz tysiące innych ciekawych materiałów dostępne są w całości dla posiadaczy Abonamentu Premium
Abonament dla Ciebie


- Kingdoms of Amalur: Reckoning - poradnik do gry
- Kingdoms of Amalur: Reckoning - krainy Detyre, Klurikon oraz Alabastra - poradnik do gry
- Kingdoms of Amalur Reckoning: Zadania poboczne
- Kingdoms of Amalur Reckoning: The Red Marches (1)
- Kingdoms of Amalur Reckoning: The Red Marches (2)
- Kingdoms of Amalur Reckoning: Alserund (1)
- Kingdoms of Amalur Reckoning: Alserund (2)
- Kingdoms of Amalur Reckoning: Alserund (3)
- Kingdoms of Amalur Reckoning: Alserund (4)
- Kingdoms of Amalur Reckoning: Alserund (5)
- Kingdoms of Amalur Reckoning: The Hollowlands (1)
- Kingdoms of Amalur Reckoning: The Hollowlands (2)
- Kingdoms of Amalur Reckoning: Menetyre (1)
- Kingdoms of Amalur Reckoning: Menetyre (2)
- Kingdoms of Amalur Reckoning: Apotyre (1)
- Kingdoms of Amalur Reckoning: Apotyre (2)
- Kingdoms of Amalur Reckoning: Apotyre (3)
- Kingdoms of Amalur Reckoning: Apotyre (4)
- Kingdoms of Amalur Reckoning: Apotyre (5)
- Kingdoms of Amalur Reckoning: Adessa (1)
- Kingdoms of Amalur Reckoning: Adessa (2)
- Kingdoms of Amalur Reckoning: Adessa (3)
- Kingdoms of Amalur Reckoning: Cursewood (1)
- Kingdoms of Amalur Reckoning: Cursewood (2)
- Kingdoms of Amalur Reckoning: The Midden
- Kingdoms of Amalur Reckoning: The Keening
- Kingdoms of Amalur Reckoning: Drowned Forest (1)
- Kingdoms of Amalur Reckoning: Drowned Forest (2)
- Kingdoms of Amalur Reckoning: Drowned Forest (3)
- Kingdoms of Amalur Reckoning: Drowned Forest (4)
- Kingdoms of Amalur Reckoning: Drowned Forest (5)
- Kingdoms of Amalur Reckoning: Caeled Coast (1)
- Kingdoms of Amalur Reckoning: Caeled Coast (2)
- Kingdoms of Amalur Reckoning: Caeled Coast (3)
- Kingdoms of Amalur Reckoning: Caeled Coast (4)
- Kingdoms of Amalur Reckoning: Caeled Coast (5)
- Kingdoms of Amalur Reckoning: High Fulgen (1)
- Kingdoms of Amalur Reckoning: High Fulgen (2)
- Kingdoms of Amalur Reckoning: Shadow Pass
- Kingdoms of Amalur Reckoning: Twilight Pass (1)
- Kingdoms of Amalur Reckoning: Twilight Pass (2)
- Kingdoms of Amalur Reckoning: Amaura
- Kingdoms of Amalur Reckoning: Zadania poboczne
- Kingdoms of Amalur: Reckoning - krainy Detyre, Klurikon oraz Alabastra - poradnik do gry
Komentarze czytelników
Zabrania się kopiowanie jakichkolwiek obrazków, tekstów lub informacji zawartych na tej stronie. Strona nie jest powiązana i/lub wspierana przez twórców ani wydawców. Wszystkie loga i obrazki są objęte prawami autorskimi należącymi do ich twórców.
Copyright © 2000 - 2026 Webedia Polska SA wszelkie prawa zastrzeżone.