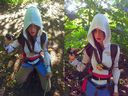
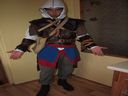
Wraz z firmami NVIDIA i Ubisoft Polska zachęcamy do udziału w Konkursie Cosplay’owym dotyczącym gry Assassin’s Creed IV: Black Flag! Wszystkich zapalonych cosplay’erów zapraszamy do zabawy, w której wcielać się będziemy w Edwarda Kenway’a – bohatera najnowszej odsłony wspomnianej serii.
Więcej szczegółów znajdziecie na http://assassin.gry-online.pl/
Jedno duże WoW - począwszy od nagród, skąciwszy na stronie... :O

Strona ładniejsza od oficjalnej :)
NVIDIA 3D Vision 2 -> ktoś na Golu w ogóle gra w 3D? Na jakim poziomie teraz stoimy :) Mi zdarzyło się tylko raz na zawodach Modern Warfare na monitorach Iiyamy ale to było dobre 5-6 lat temu ;)
Super, aż pierwszy raz od bardzo dawno wezmę udział w konkursie na gol'u :D

Widzę że zainteresowanie jest ogromne. W sumie nie ma co sie dziwic po ostatnim oszustwie konkursowym ubisoftu z AC

Z góry współczuję, posiadaczom kart AMD, słabej wydajności w AC4 . [*]
NewGravedigger jakim oszustwie?
Widzę że na razie nie ma konkurencji to chyba spróbuję, prześcieradło w domu jest, pasek też, bluza z kapturem też więc mam duże szanse :D

Polski Ubisoft nie żałuje pieniędzy na promocje swoich tytułów. Kolejny taki konkurs od tego wydawcy. Brawo, że się starają, a nie osiedli na laurach jak Electronic Arts Polska.
A do tego konkursy trzeba być pełnoletnim?
Dzięki wielkie :D
Szykujecie coś?
Sorry for posting in English as I can't speak Polish and I'm from The Netherlands myself.
Do we have to post the pictures here??
I still have to make the hidden blades and a few small details and then my female version will be done.
A couple of friends are also joining from the Netherlands as well!!

Pierwsze słyszę, żeby ludzie z zagranicy brali udział w golowym konkursie, ale według regulaminu udział mogą brać Polacy i obywatele państw członkowskich Unii Europejskiej. I jeszcze z opisu wynika, że jest to jakaś naprawdę zaawansowana konstrukcja. Domyślam się, że niektórzy ludzie zaczną srać żarem, jeśli wygra nie tylko junior, ale i obcokrajowiec.
Megumii - Yes, you post all of them (10 or more) right here. You know you'll have to come to Poland if you win, right?

Megumii
In order to add a comment with a picture, scroll down to comments section and press "Dodaj swój komentarz" button. Then, in a new window, press "Przeglądaj" button and point out the picture you want to publish. Additionally, you may write a comment in "treść twojej odpowiedzi" section. When you're done, press "opublikuj swoją odpowiedź" button in order to publish your photo. You can find more information on how to create an account at GRYOnline.pl in contest terms (paragraph 5). In case of any problems with registration, please write an e-mail to [email protected].
Do we have to post the pictures here??
Yes
Tak swoją drogą, to przyjazd na sesję zdjęciową do Krakowa jest obowiązkowy, bo nie widzę tego w regulaminie, a napisałem, że jest?
Azerath - nie, nie jest obowiązkowy. Zwycięzcy dostaną zaproszenie na specjalną sesję zdjęciową z profesjonalnym fotografem a rezultaty będzie można podziwiać na naszych stronach. Jest to więc dodatkowy bonus, natomiast jeśli ktoś nie będzie mógł przyjechać to nikogo zmuszać nie będziemy. Oczywiście, będziemy się starać jak najbardziej ułatwić dotarcie do Krakowa :)
Megumii - It is nice to see you here! As you could see in terms of the contest: "In order to make your contest entry valid, you must provide at least five pictures of the costume in preparation and at least five pictures of readied costume. Optionally, you can also present a video material." If you have any additional questions do not hesitate to contact us: [email protected]
There is no obligation to visit Cracow if somebody win this contest, however we will be honored if winner will attend professional photo session. We will try to make this trip as easy as possible.
Haha thank you all for the info!!
Then be prepared ;) hopefully I will be able to share pics / video of the costume in the upcoming 2 weeks.

Mam pytanie...Strój ma zostać wykonany własnoręcznie tak? a takie elementy jak szabla czy pistolety również? W regulaminie dopuszczają kupno pasów,peruk oraz butów ale nie jest nic napisane własnie o szablach czy pistoletach........
Popkensan -> po Twoim pytaniu odbyliśmy rozmowę i stwierdziliśmy, że warto doprecyzować regulamin. Sprawdź proszę punkt 2 regulaminu, myślę, że znajdziesz tam odpowiedź na swoje pytanie.
After Popkensan question we had a disscusion about rules and their accuracy and we decided to slightly modify them - please, check paragraph 2 in contest terms.
I have quite a few photos of Work In Progress, I'll try to group most of them in collages, is it ok if I post them all here? I hope it won't seem like spamming....
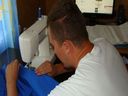
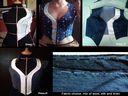
Hello! This is the first WIP photo I'm posting. I'll also add an explanation on how I made the vest. More photos coming these days :) Sorry for the long description and unnecessary details, I lust c/p-ed it from my page >.<. I hope you don't get bored, I like to explain what I do in detail :P
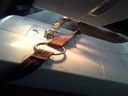
How I made this: I put the white and blue vest on a manequin of myself and put scotch tape on it. Then, using a marker, I drew the lines of the vest, as I considered it to be best fit. Here's a photo of that: [link] .
Then I cut the pieces out of leather. I didn't have much leather, initially I thought I had more than enough, but when I realized I need to double everything, I knew I was in trouble. I think I had around 1 square meter of leather, maybe a bit more. The advantage with leather is that you can position the patterns in any position on it and cut, so the losses of material were minimal. The really small parts I made of the scraps I had left.
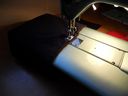
Everything is two layers and since this leather was rather elastic, I had to glue the two layers first and then sew them together. My sewing machine behaved impressively. The leather was rather soft, I admit, but it has sewn through it better than through vinyl, I must say. Especially since this leather is pretty "natur", it's not shiny and sticky, like vinyl or other types of leather, so the sewing machine loved it. It went best through 2 layers, but if necessary it could go through 3. All that you see with more than two layers (The shoulder pads, the long stripes on the front, the small ornaments on the stripes, the collar), it's glued with impact glue, which I used for the whole vest (I totally used around 270ml of impact glue for the hole vest. One evening I went home with a terrible head ache because I got to smell the impact glue too much... )
I used silk thread, it's way better for leather than the regular thread. For the black parts of leather work I found some very sturdy silk-looking synthetic thread, which is even better, because it's thicker. Sometimes the sewing on the leather is pure ornamental, so it must be visible and pretty. I tried to achieve that, actually.
Second photo, some more WIP from the leather vest, with some details:
Right photo: Another shot of the back, right after I finished sewing it. I like this shot because it shows very well how the leather looks like. When I chose it, I made sure it's not very glossy/shiny. I chose one that had a very natural feel to it (it absorbs water, it can get stained) and I was lucky to find one that seemed old and worn out, actually. As you can see in the photo, it seemed stained and old, but I still plan to weather it some more for the final result.
Top left: This is the collar, and since I didn't have enough leather to make it all out of two pieces, I decided to split the two layers in more parts: one in two parts, cut right in the middle of the back and the other one cut in three parts, so the cut lines do not overlap and create inconveniences. Glued the parts together and zig zag-ed the cut lines, to make sure they don't fall apart. Then I glued the collar to the vest and I still need to hand-stich it, because I don't trust the glue completely.
Middle left: This is an example of how I worked with most of the parts. These are the small ornaments on the front of the vest. I glued two layers of leather together with impact glue, then I traced on top the shape I actually need. Before cutting it I carved using a sharp metal tool and then a sharp wooden tool some ridges, where the sewing should be. When working with leather, sometimes, before sewing, the crafter carves a ridge for the thread, because it looks better and because it prevents the thread from being damaged in a short period of time. I tried to achieve that on a smaller scale.
Bottom left: These are the shoulder pads, before being glued to the rest of the vest. They are made out of four layers of leather (two and two), each glued and sewn together and then glued again - bottom layers + top layers + strap ) :). I had a hard time designing them, as Edward is a man and has wide shoulders and since I'm a woman I was supposed to shrink them a lot. I made them slightly bigger that I should have (they surpass the edges of the white and blue vest), but otherwise the whole thing would have looked completely ridiculous.
Hi Shinju!
It is great idea to make collage from your photos - feel free to post them in that way. It is also allowed to upload every single photo with another post - we will not consider this as a spam.
We are waiting for more photos and the final one! :)
I have to remind you about two things - both male and female costume versions are acceptable and please, remember that costume must have a cleverly placed symbol, known as NVIDIA Claw.
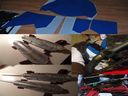
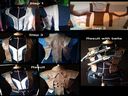
Some more WIP, this time for the guns:
How I made them:
I received a fake gun (it was a lighter) from a friend, so I took it apart and made silicone molds out of each part.
1. This is the base of the gun (it was wood), prepared to be molded. It had quite many holes in it so I filled them with clay to make my work easier.
2. I brushed silicone on the gun base and decided to make a mother-mold (a stiff case surrounding it) for it. I made it out of plaster. you can see the gun prepared for making the mother mold (out of two parts) in this image. In the end I didn't need the mothermold anymore, since the silicone part turned out to be sturdy enough.
3. I casted the base of the gun out of polyurethane resin. The original wood gun base had dents in it as it had been used and hit, and made my resin part loom more realistic. I casted three of these, for three guns. The small one I cut and transformed, but I'll upload another image for it. I painted them with brown acrylic paint and then sprayed them with clar shiny laquer, to give it a more "woody" look.
4. This is the one gun put together before being painted. It was all put together with screws.
5. These are some of the molds made out of silicone for the "metal" parts. Even though I did not make the pieces myself, molding them was a pain in the a**, since they had very weird shapes and I had to think of creative ways for making the molds easily usable. By far the most difficult molds I have ever made.
6. Some of the casted pieces. They were all casted out of polyurethane resin dyed black. I casted almost 3 pieces out of each part.
7. The pieces that used to be black are now painted with silver acrylic paint and then matte laquer on top, t prevent the paint from peeling off. I used the dry-brushing technique, a brush with very little paint on it touches only the tips of the pieces you paint, so the shades and highlits come out and give a realistic look.
8. The guns put together, using screws. I had a big debate with myslef about the ends of the big guns. There are supposed to be some wolf heads at the end of the guns. I started sculpting them and then I realized they were HUGE, and since the guns are still slightly big for my female body size, I decided to sick with the end the small one has (a face with a ring in the nose ). I sacrificed a bit of the reference to get a better overall look for the cosplay.
I still have some parts to add on the other side of the gun, but I only made them and I still need to mold and cast and paint them More photos soon!
For a big and clear version of this photo, here is a link to it posted on my DA account:
[link]

WIP on the small gun.
This is how I made it. Cut parts out of the big gun and put them together. It turned out slightly bulky, but I didn't quite have the time to make it perfect.
I guess we have a winner already;) Really nice stuff Shinju. Looking forward to see the final product:)
Marcin017 - samo forum nie jest angielskie, natomiast konkurs ten, a więc i wątek w komentarzach jest dwujęzyczny, stąd i posty w języku angielskim.
Hey all!!
I'm finished with my female version of Edward Kenway
I have some work in process pictures as well and I hope to have a photoshoot this weekend!!
Anyway get ready for some serious spam XD
The Top:
Step 1: I molded a pattern on my fitting dol
Step 2: Made a test top out of cotton
Step 3: Made the top itself. It is fully lined (not shown on picture) and it took me some work to get the sleeves right.
I used a very nice fabric mixture of wool, silk and linen and it had this awesome jeans look!
Since not many people believe me on the mixture of the fabric I posted proof of what the side of the fabric said.
Again WIP pics
This time the leather jacket!!
The Jacket:
Step 1: Again I molded a pattern on my fitting doll and this time with the top on for extra space. Else it would get too tight.
Step 2: Everything was cutted and again compleely lined it with lining or leather itself to give it more body but also it looks prettier when the jacket falls open or somebody sneak peeks inside the costume.
step 3: The basic shape of tje jacket is sewn or pinned. No extra details on the jacket yet.
Result: Added the details to it like the small pieces with the 'nails' kind of things in it. Since my jacket was too thick I had to glue them on.
Added extra photo with the belts on it.
Note: most pieces where topstitched and my sewingmachine had alot of trouble doing that.
It was a very thick kind of fake leather.
Lucky that fake leather is easy to glue put I prefer to stitch.
WIP Hidden blade time!!!
I promised myself to at least give it a try to make a working hidden blade.
I failed hard since I'm not a mechanic and have simply no idea on how things work ;__;
Finished up to 50% of a working blade but got stuck and since I think that 'looks' are before 'working' I just made a pair out of funfoam and wonderflex.
It was my first time using wonderflex. Wonderflex is some kind of plastic that melts when you heat it up. You can make alot of forms with it and when it cools down it hardens again.
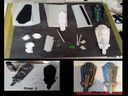
Hidden Blade:
Step 1: All pieces laying down on the table. It's like making a 3D-card or something XD
In the right upper corner you see the blueprint I found on DeviantArt
[link]
From right to left (duuh)
blade - piece that goes over the blade - basic shape
From left to right (omg logic)
small detail pieces - belts and D-rings - more details - a semi-finished hidden blade.
Step 2: When all pieces where melted together it was time for some black primer (acryl paint) and silver paint (acryl paint)
Step 3: To add more shape and make the blades look older I used a black acryl paint and tried several ways to paint it.
Mixed alot of water with with paint, used a tissue to suck of alot of the mixture from the brus and slapped the brush alond the sides just enough to leave some paint on the edges but not too dark.
In step 3 picture the blade wasn't completely done cause after drying I redid the yellow paint, used the same technique with the yellow parts and added extra black on the edges of all the details to give it more depth.
Added small fake leather straps to wear them with my vambraces.

Sword and the hidden NVIDIA logo
Ok I seriously had no idea where to place the logo and I was not sure if I wanted the logo to stay in the costume itself.
Then I found out that Edward's swords do have some kind of special design on the handles.
At that moment I found out that I could make the handles look like NVIDIA logos!!!!
Bought a pair of nice looking fake swords and I used funfoam and wonderflex for the NVIDIA logo.
Well..actually it's the cutout of the wonderflex that has the hidden NVIDIA logo ;) not the wonderflex itself.
The swords and the hidden NVIDIA logo:
Step 1: use funfoam and wonderflex to make the shape and use a round object to make the handles get a sphere shape. Wonderflex can bend in many positions and you want enough space to put your hands with your vambraces and hidden blades so a sphere kind of shape wouldn't be so bad.
Step 2: At first I painted the parts bronze...but the handles of my sword have a gold-ish tone. I added a bit of black and tried it out on the handle itself where the wonderflex is wrapped around the handle.
You can see that it matched the handles immediately!! So I waited till the bronze tone was dry and repainted it.
Step 3: I repainted the handles with the bronze + black acryl paint mix and it looks so much better allready. You can't tell that the handle wasn't part of the blade XDD
Step 4: This was the first time that I used that specific paint technique I mentioned before with my hidden blades.
The handle got this gold rusty look and I created darker and sharper looking edges thanks to the black paint.
Seriously...a little paint can do alot and I never really knew how to do it but I just tried it out and it seems to work.
Also note that ofcourse one sword is having a mirrored logo. But in this case 1 of them is at least right XDDD
WIP the hood
The hood:
note: I allready made a few tests so I these picture are from that moment that I decided the hood was good enough.
Step 1: making new patterns based on my Altair female version I did before and lay them on my fabric and lining. (yes again I used lining. Lining finishes a costume so nicely and gives it more body. Also darkens out the area in the hood cause I used a nice dark blue matching lining)
Step 2: testing out if the shape was still right.
Step 3: Added the lining and extra pieces to give it more body. It is also easier (for me) to finish certain edges.
Step 4: I hand stitched little pieces of matching jeans (used my fiance's trousers :P )

Not much WIP picture but a nice one to share as well
These are the basic garments of my female version.
I made a lace shirt that goes underneath the top. This way the boobs are covered but does show skin in a neat way. A bit of a teaser I would say XD
The top itself has this horrible collar that I almost wanted to cut of but in the end I used press buttons so the hood would stay in place and won't fall of and the collar would look better.
I had this old jeans belt laying around somewhere and found out that this would be perfect to add to the costume. It would also help to add the jeans pieces to it.
I made a skirt with a soft satin with a pattern on it (also used as lining in the jacket) and a chiffon.
yes the skirt shows to be a bit yellow-ish compared to the rest.
Finding the right fabrics in a short period of time isn't easy. Yet also the fact that this might give the skirt a bit of an old look.
Could have been my mom's weddingdress or something XDD
Why the neat look?
Well I wanted a female version which had this classy woman look but also had the edgyness of a cool chick.
Mixing leather and lace, silk and guns, and blades and curls makes a very perfect balanced powerwoman XDDD
In the end it looks neat but cool enough for the guys to think twice before stepping up to this type of woman.
Cause you never know if she's going to like or kill you XDD
Belts, belts and ehmm....guns X__X
Never in my life have I made a costume with so many damn belts and guns.
The guns where bought only and had these horrible orange plugs on them.
In order to have a more better shape I cutted and filed of the extreme round edges. (almost had my guns killed doing this X__X)
I'll start on the top:
Small brown belt is self made. Just had some long scraps laying around from my vambraces and this perfect enough for this belt.
Wider belt with gunloops.
I bought 2 belts. 1 belt to wrap around and make 1 loop and 1 extra belt to make the other loop.
On the loops there are buckles made of wonderflex.
note: the skull isn't placed on the belt yet
Belt around the waist:
got a few belts from my friend and it wasn't the right color so I wrappeda piece of fake leather around it to match the colors again.
I made:
- 2 sword loops
- 2 pouches (with left over hood fabric as lining)
- 2 real leather gunholsters.
- 2 small belts
Must admit that this is pretty heavy to carry around...it almost feels like my own personal bag XDDDD
Matt, Cool Breeze: thank you guys! More WIP coming up... I'm working like crazy nowadays! >.<
Now I got to the swords. Initially I wanted to make both the swords in the artwork, but since I'm running out of time, I decided to stick only to one of them and make it look good.
This is the first photo of the WIP for the sword, on how I made the guard at the handle, which is the main part of the sword.
I am not particularly good at making patterns without a base, so I made the round shape for the guard out of clay, put scotch tape on top and drew the pattern on. Cut it out, transfered in on paper and then cut it out of one layer of wonderflex. I heated that one up and shaped it on top of the clay. But since it was wobly still, I reinforced it with wire flattened with a hammer and added another layer of wonderflex on the back. Now it's really hard and I can still shape it as I wish, since it has the wire inside.
Then I sprayed it with some white automotive body filler, to make it all smooth and nice to paint.
A bit about the blade: cut it out of two layers of forex/pvc foam (3mm thick), made it "sharper" with a cutter and then smoothened it with sandpaper. Then two layers of body filler and then some more sandpaper :) then I painted it black as a base and then used silver acrylic paint to paint it, using the drybrushing technique. I also did some scratches and dents on it, to make it seem used.
I also changed the original design of the guard, to make it fit the requirements for the NVIDIA competition, but about that I'll come with another post/comment :)
So, this is the second part of the progress to the guard to the sword, with everything explained:
1. The guard was previously sprayed with white body filler. After that I painted it with brown acrylic paint as a base (I use black for silver and brown for gold).
2. Then, using the drybrushing technique I painted it golden, leaving some shades for the depth.
3. This is the blade through the guard. I was starting to attach them properly together.
4. I stripped the net off the back of some wonderflex and used it to "glue" the handle to the guard. I also added some more wonderflex to the handle to make it rounder, for a better grip.
5. After that I made the round ornament at the end of the sword, also out of wonderflex stripped of the net, so it can be modeled like worbla.
6. Since the rest of the sword was already painted, I masked it and used some body filler only on that round ornament. It became all nice and smooth with two layers only.
7. I painted brown the remaining parts (except for the handle itself), as a base for gold acrylic paint.
8. I drybrushed golden acrylic paint on the ornament.
9. Using a strip of black leather that I glued to the handle with impact glue, I made it look nice and I also made a comfortable grip.
Result==> happy me
I also need to add that there are some parts of the guard that I need to repaint and ornate some more, according to the requests of the competition, but that will come later ;)

This is the whole sword, from two angles.
Witam,
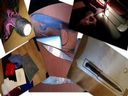
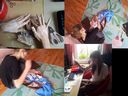
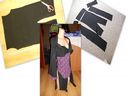
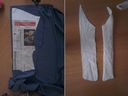
wstawiam pierwsze zdjęcie dotyczące mojej pracy. Wykonałam strój na wzór Assassin, ale w wersji damskiej. Na zamieszczonym kolażu widać wstępny projekt stroju oraz materiały jakich użyłam, niestety nie skorzystałam ze wszystkich, ponieważ koncepcja mi się ciągle zmieniała :P Widać także, w jaki sposób z tapicerki (tapicerka używana do okrywy foteli dentystycznych) wykonałam pochwę do noża oraz pas, naramienniki, usztywnienia ramion oraz nadgarstków. Po lewej stronie na górze widnieje "pałka" (kijek z sosny), którą oplotłam za pomocą krajki ( resztki materiału) oraz 3 pasm różowych ścinek. Prócz tego widnieją 2 sztylety (wycięte z resztek blachy), które w końcowym efekcie znajdą się w moich rękawach- usztywnieniach przy nadgarstkach.

Na zdjęciu widnieje proces robienia sztyletów wystających z usztywnień przedramienia. Tak jak pisałam powyżej stworzyłam je z tapicerki, wiązania natomiast z krajki. Bardzo potrzebny okazał się dziurkacz :D
Tutaj widnieje tył koszuli, uznałam że zmiana kolorów ubrania Assassina nada mojemu strojowi trochę indywidualizmu. :P Na zdjęciach widać również gąbkę, która usztywnia naramienniki. Gąbka używana jest do obklejania mebli przed położeniem bardziej miękkiej warstwy gąbki oraz tapicerki.
Tak wygląda strój w pełni wykonany. Pytanie do osób prowadzących konkurs:
Czy znak Nvidia może być w komponowany w strój, jako tatuaż?
Proszę o odpowiedź.
Z góry dziękuje.
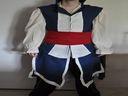
Kaptur wykonany jest przeze mnie z dwóch rodzai materiałów. Całość jest uszyta z czarnego, dodałam do niego element różu, który nawiązuje do gorsetu. Naramienniki wykonałam z gąbki oraz tapicerki. Obszyłam gąbkę tapicerką, aby były dobrze usztywnione. Wszyte są one w górę koszuli. Ochraniacze przedramion oraz nad nadgarstkami uszyte są z tapicerki. Umiejscowione są na mnie przez splot krajką. W ochraniacze nad nadgarstkami wszyłam dwa sztylety. Sztylety są wycięte z resztek blachy (bodajże dachowej ;p).
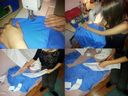
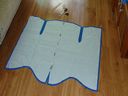
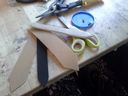
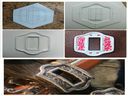
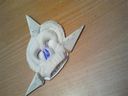
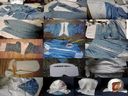
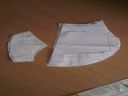
Tak zaczęłam swoją pracę nad strojem. Niebieską bazą jest stara bluzka, natomiast białe wykończenia to elementy prześcieradła. Moją robotę rozpoczęłam od zwężenia niebieskiej bluzki, odprucia kieszeni, zamka, pozbycia się rękawów oraz przyszycia guzików. Następnie wykroiłam białe części. Wszystko wykończyłam na maszynie. Potem z tego samego prześcieradła wykonałam kaptur.
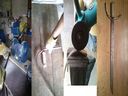
Następnym krokiem było wykonanie z gliny czaszki na pasek, charakterystycznej dla stroju Edwarda. Z elementów skaju wyszyłam ręcznie kamizelkę oraz naramienniki i karwasze. Do stroju dodałam stare paski, zimowe kozaki oraz pistolet i zdobiony nóż z kolekcji mojej rodziny.
Part 10. Koniec spamu :) Mam nadzieję, że Państwu spodoba. Dziękuję :)
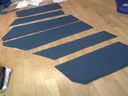
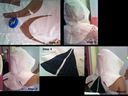
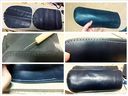
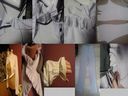
Sooo, here is how I made the upper arm leather protections:
I made the pattern by putting scotch tape on my arm, drew on it and the transfered it on paper.
I cut the pieces out of leather, two layers for each piece. As you can notice, on one side there are some extra cuts. I made those in order to give it a rounded shape on the shoulder when I glue them together.
I glued the two layers together in a rounded position, as if it were actually placed on an arm. Thus, it tends to look better when I wear it, it won't bend in funny ways. Notice the rounded shape on one side of the piece (top right photo).
Now, since this leather is waaay stiffer than the one I used for the vest, my sewing mashine could not handle sewing through two layers, so I had to do it my hand. First I punched the holes with a sharp tool (I have no idea what is its name in English) - middle left photo. Then, bit by bit, I did the sewing by hand (middle right photo). You can see how it looks on the back in the bottom left photo.
Bottom right photo is one piece, all new, shiny and pretty.
More progress soon!
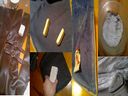
The weathering for the upper am protections.
There are things I used to weather the leather: sandpaper and water mixed with salt... lots of it!
With 60 grit sandpaper I scratched the surface of the armor and rounded the edges. If you think about it, as it gets worn out, the pretty sharp perfectly cut pieces of leather lose their shape and I tried to give this feeling. Also, since this leather was well treated, it was all shinny and water would not stick to it at all, so I had so sand quite a lot to prepapre it for the water with salt (top left photo). You can notice it's whiter on the parts where I sanded it.
The buttons I had previously bought and added a black wash to them to make them look older and to emphasize the ornaments (top right photo).
You can see how I did this in more detail here: [link]
Middle left - you can see the two armor pieces with the buttons sewn on. I had to actually punch holes in the leather all the way through, because the "hole" underneath the buttons was really big (3mm in length). This made the whole process really long (it took me around 3 hours to sew all the 20 buttons.
Middle right - Mixed water with lots of salt and brushed it on the pieces. Then I poured some more salt on top, using the salt shaker.
Bottom left - this is how it looked all dry out in the morning.
Bottom right - using a soft cloth I wiped the salt off, but some of it remained, and this is the result. I still need to add an attaching system to the arm, and it's done!
Oh, I have the same post three times... could an admin please delete the first two? only the last one (out of the three identical ones) has a photo. I'm having a hard time posting my photos, I think it keeps telling me they are too big or something...

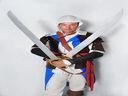
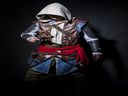
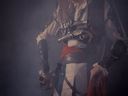
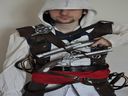
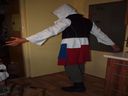
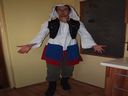
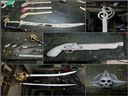
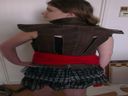
no to lecimy ;) Kostium wykonany własnoręcznie, szyty ręcznie nitką i igłą ( nie posiadam maszyny więc skórę też musiałam szyć ręcznie ). Starałam się jak nawierniej oddać grafikę z gry. Pomimo, że jestem dziewczyną, uznałam że taka forma oddania stroju będzie najwierniejsza. Koszula z naramiennikami, z postarzanymi guzikami, spodnie lniane szerokie luźne, buty są kupione, wywnięte na górze. No to płaszcz assassina niebiesko biały, zgodny z szablonami znalezionymi w sieci, płaszcz z guzkiami niebiesko złotymi, z motywem kotwic. Na płaszczu są "zabrudzenia" dla dodtania efektu niekoniecznie najczystrzej tkaniny ( wszak był to pirat nie francuski laluś ) Skórzany płaszcz z rzędami guzików i romionami. Także szyty ręcznie nitką i igłą ( bolało XD ). Przepasanie pasem, z klamrą, czerwona tkanina lniana do przepasania. Kaptur z dwoma trójkątami na niebiesko wedłóg grafik. Na piersi dwa pasy trzymające kaptur jak i na broń. Czaszka lepiona z masy plastycznej lekkiej ( empik, wysycha na powietrzu), malowana aktrylami, pas zdobiony doma metalowymi klamrami do trzymania broni. Kolejny pas z kołami wokół bioder. Z tyłu dwie "kieszonki" Szyte z włoskeij skóry jedna mniejsza druga większa, również wedle grafik. Z kupionych rzeczy - pistolety i szabla, na pistolecie wypukły znak Nvidii na rękojeści.
Dla zainteresowanych więcej fotek na stronie :)
https://www.facebook.com/AnnCosplay?ref=hl
Mam nadzieję zę się podoba :)
"How It's Made" by Shinju ;) I'am waiting for the whole outfit ;)

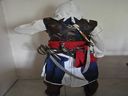
tył z kieszeniami, zapomniałam wspomnieć o ostrzach. Wykonane z drewna, metalu, pianki eva, pomalowane i wystylizowane za metal. Posiadają ostrza zamontowane i wysuwane na prowadnicach.
Powiedzieć, ze konkurs został zdominowany przez żeńską część graczy to mało...
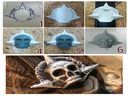
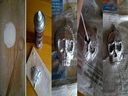
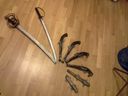
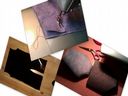
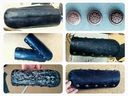
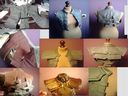
Here are some details on how I made the skull for the big chest belt.
1. Compared to the size of the belt, I drew the pattern on a piece of paper.
2. Then I transfered it to a piece of forex/pvc foam, 1mm thick. Using several types of sharp tools, I carved some shapes in the plastic, to fit the pattern.
3. I made the spikes out of forex/pvc foam also and glued them to the base with super glue. You can also see it placed on a piece of belt.
4. I added some oil based clay and started scupting the skull.
5. The hardest part was carving the cheek holes, I just couldn't get them right. The teeth were really fun to make and easy.
6. I sprayed some primer on and let it dry, so I can make a mold out of silicone and cast it out of resin. I can't wait to paint it!
Underneath you can see the reference I used.
Totally uninteresting update, but here goes:
The big belt has a few ornaments and I made them.
I made a pattern and transfered it to a piece of forex/pvc foam. This was meant for the sides. Cut the forex on the sides that come inside the ornaments and the I smoothened it with some sandpaper, to get rid of the sharp edges. I glued the pieces like this onto another sheet of forex/pvc foam (1mm thick, I forgot to mention) and then cut the putside lines and the hole in the middle. I also used some sandpaper to round the lines up and it was ready for the next step. I sparyed the whole thing with some automotive body filler and let it dry. Afterwards, using some 3D paint, I drew something on top and smudged it.

widzę, że mamy bardzo ładne panie na forum
spoiler start
BlackElf and Torianna
spoiler stop
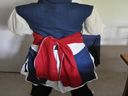
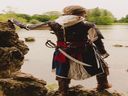
Bok stroju: broń biała, to bagnet (znalezisko z ziemi :)), oraz pojemniki na bomby.
Moje ulubione zdjęcie :D Z tyłu widać wiązania krajką na gorsecie, oraz broń. Widnieją także pasy z koszuli, spódnica oraz pas (chusta)--> pas nie jest własnoręcznie uszyty. Reszta natomiast już tak. Buty także nie są moim dziełem :P
Wstawiam zdjęcia trochę nie po kolei, ale nie miałam karty ze starszymi zdjęciami. Na zdjęciu widać rękaw koszuli podczas szycia :)
Na kolażu widać koszulę w różnych etapach tworzenia. Także całość w raz z gorsetem. Gorset zszyty jest z 3 części materiału, z tyłu łączony wiązaniem.
Ostatnie wymagane zdjęcie :) na wszelki wypadek dorobiłam symbol Nvidi.

The shirt of my Assassins Creed cosplay, still without sleeves and everything. I've done my best to pick authentic looking fabrics, and after sewing them all together I proceeded in weathering everything, using acrylic paint and sandpaper.
Work in progress picture of the shirt of my Assassins Creed cosplay, still without sleeves and everything. I've done my best to pick authentic looking fabrics, and after sewing them all together I proceeded in weathering everything, using acrylic paint and sandpaper.

Work in progress picture of the shirt of my Assassins Creed cosplay, still without sleeves and everything. I've done my best to pick authentic looking fabrics, and after sewing them all together I proceeded in weathering everything, using acrylic paint and sandpaper.

Work in progress picture of the shirt of my Assassins Creed cosplay, still without sleeves and everything. I've done my best to pick authentic looking fabrics, and after sewing them all together I proceeded in weathering everything, using acrylic paint and sandpaper.

Work in progress picture of the shirt of my Assassins Creed cosplay, still without sleeves and everything. I've done my best to pick authentic looking fabrics, and after sewing them all together I proceeded in weathering everything, using acrylic paint and sandpaper.

Work in progress picture of the shirt of my Assassins Creed cosplay, still without sleeves and everything. I've done my best to pick authentic looking fabrics, and after sewing them all together I proceeded in weathering everything, using acrylic paint and sandpaper.
The leather vest parts all cut out and worked with sandpaper, for a more realistic weathered effect.
Work in progress picture of the skull belt. It's made out of fimo clay and plastic sheets, and will be painted with acrylic paint.
Another progress picture: the hidden blades. They are made of plastic, and the skull is clay. I've used a slider from a drawer to make sure the blades can pop out.
Minor details! One of the parts on the belt with the skull buckle. Made of plastic, dented/decorated by stabbing it with scissors.
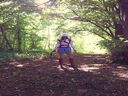
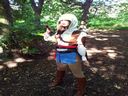
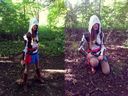
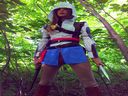
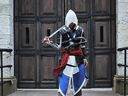
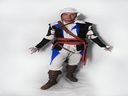
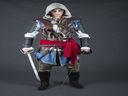
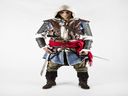
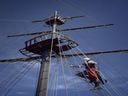
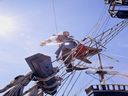
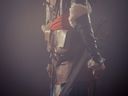
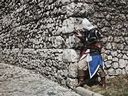
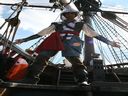
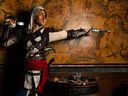
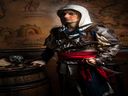
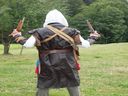
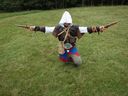
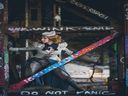
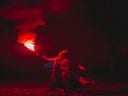
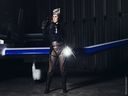
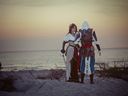
My finished cosplay, below deck. Ready to attack, using his Nvidia Claw shaped dagger
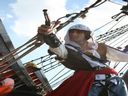
Showing of my hidden blades!
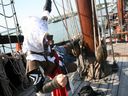
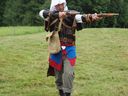
Action pose with a flintlock!
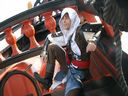
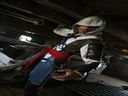
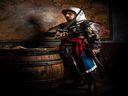
Relaxing on deck. Not every minute on board a ship is equally exciting.
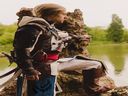
Dangling from a rope, ready to attack with a hidden blade.
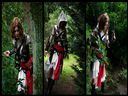
In this picture you can clearly see the Nvidia Claw symbol on the right upper arm piece.
First WIP of the costume (1/5)
I first designed the fabric part of the costume. I choose to do the gameplay version of the costume, instead of the announcement CG trailer one (tails are different, belts are too.)
Here you can see the global shape and the two coats, and you can also see it lacks ironing.
Second Wip of the costume (2/5)
Doing the red belt first was important to see how big would the leather belt be.
I choose to take only "historical" fabric. All the costume is made of linnen (cotton being pretty exotic at this time). The red belt is thus made in cotton to give an impression of Edward travelling and customizing his costume through his travels.
Wip 3/5
The next step was to do the leather parts of his armor.
An important thing on Edward is the used look of the costume. Instead of aging the costume after it was done, I bought a second hand leather coat and took all the leather I needed out of it.
The pants was all new and not customized at that time.
The buckle was made by a friend. Since then, I replaced it with the official McFarlane skull head.
Wip 4/5
For me, it was important to give back the look of multiple layers being all above the others. I took a different quality of leather for the back tails. All the rivets and metal pieces are real steel.
Also, the fabric parc underwent an aging process before the leather was added.
Two black tea baths, a whole night under the rain, a whole day at the sun. All of those treatments were to give the aging a natural look.
Shoe polish and brown paint was then added.
Wip 5/5
Belts are done. Again, for authenticity, I took second hand leather for the leather belts. I altered it with a metal file so it would look a bit damaged.
The hood is big because I wanted to put a wig on my head to get the blonde hair :)
As you can see, the holsters were still a work in progress.
WIP 5/5 bis
Back view of the costume.
The leather on the back still missed the aging with the metal file.
SSeith - please note what was written in contest terms: "In order to make your contest entry valid, you must provide at least five pictures of the costume in preparation and at least five pictures of readied costume. Optionally, you can also present a video material."
We have now your whole-made cosplay, but what about the vest? Did you cut it by yourself? Was gun bought or made? Please provide us with those information. What is more - if you have any pictures from preparing this suit - please, upload them. It will prove that you made it by yourself - it will be very important while choosing the winner.
I added the nvidia claw using photoshop.
Here, it is on the hood. Like an embroidery !
As you can see, the costume was now finished :)
@mycha734
Yes, I did cut my vest myself, like all the other costume I do lol :') What I sent is the step of me doing the costume, I don't have picture of me cutting the vest, as there is actually no point in it.
If this is not enough, or if you don't believe me, you will find WIP for all my other AC costumes since 2010. [link] or the process of connor, ezio, aiden pearce from watch_dogs on my website pieces-of-eden.com
It disappoints me that my honesty was questionned here....
That being said, to answer you question, I did buy guns and swords. I also had the blades done by the same friend who did the skull head, and they broke during E3, so I took the official McFarlane blades
The Nvidia Claw used as a tribal tattoo !
The tribal tattoo, another shot :)
Again, the embroidery on the hood !
Finally, an embroidery style Nvidia claw on the front tail !
SSeith - please, do not feel offended, we do not question your honesty - there are just rules which we need to follow so I wrote my post to let you know what we need and what will be taken into consideration while choosing winner. It was just a hint, not a way to make you feel bad.
We will ask everyone to send us those photos or videos, as it is written in contest terms.
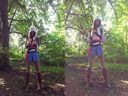
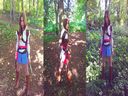
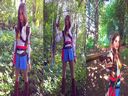
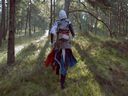
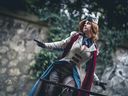
Hi all!!
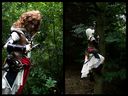
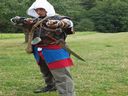
Time for picture spam again only this time with a costume that is finished ;)
I'd like to credit my awesom photographer Melissa van den Hoogen for her awesome photo's
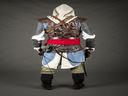
Please notice that the NVIDIA logo is the cut-out of my sword handle.
I have a right and left sword so it means that one of the sides is mirrored.
I hope it is visible enough and I will re-post a picture of the swords itself if needed.
Also small note:
This photoshoot have got me climbing into trees, scratched my legs open thanks to blackberrie bushes and yes that swamp water was awefull and gave me horrible wet feet XD
All for a good shoot ey ;)
Photo's part 1
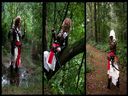
Photo's part 2
Photo's part 3
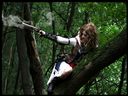
Photo part 4
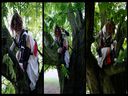
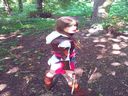
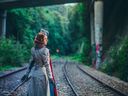
These 3 photo's where taken by a different group of photographers who helped me climb up high in the tree.
The tree was very wet and slippery because of the rain and turned my costume green XDD

Once more the sword process picture to show you where the NVIDIA logo was hidden (it's almost like an easteregg in a game but this time it's an easteregg in a costume XD
The cut-out of the handle had the NVIDIA logo crafted in it.
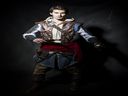
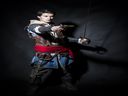
Witam :)
Więc w końcu udało mi się kostium zrealizować, zanim włożę zdjęcia to postaram się, troche opisać jak swoją prace realizowałem. Na sam początek - koszula klasyczna biała, z przedłużonymi rękawami na końcach rozszerzone, do koszuli ze spodu przyszyte czerwono niebieskie częśći (tkaniny),u góry doszyty kaptur (z białego prześcieradła) na tym kamizelka czarna (w szafie znalazłem :D), buty i spodnie także znalezione (w domu), kamizelka skórzanna jest wykonana z starego płaszczu, ochraniacze na rękach także z tego płaszczu. W zasadzie dużo rzeczy mam od znajomych i przyjacioł, takie jak miecz, nóż, opaski oraz kusza. Logo nvidii jest wykonane z kamienia ( wyrzeżbione linie i mazakami wykolorowane) na sznurku zawieszone. Pistolety są replikami (dokupione)
Po kolei dodam zdjęcia, już gotowego stroju : )
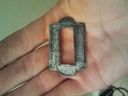
Logo Nvidii
kusza przymocowana na plecach
kostium w całośći
poza z pistoletami
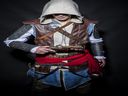
zdjęcie z tyłu
kolejne z przodu
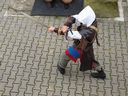
celowanie w bok
pokaz pistoletów
celowanie w bok 2
miecz i nóż
wip milou. A lot of ambrodery, ALL element are self made, including, hat, shirt, pant, holster etc etc
heloise Adler, my original character, is inspired by Edward outfit color and design, but i chew to change the character's time. I have studied the look of Krakow city, and the the story of my country (France) i have decided to make my assassin live in 1940' during WWII. In fact the WWII look is more suitable for Krakow and Paris. If Edward was an 1940' assassin? i try to keep a lot of edward outfit elements. Enjoy!
part 1
heloise Adler, my original character, is inspired by Edward outfit color and design, but i chew to change the character's time. I have studied the look of Krakow city, and the the story of my country (France) i have decided to make my assassin live in 1940' during WWII. In fact the WWII look is more suitable for Krakow and Paris. If Edward was an 1940' assassin? i try to keep a lot of edward outfit elements. Enjoy!
part2

part 3
part4
part5
part 6
part7
wip again, (sorry i didn't realise the size of my picture)


spam part 8
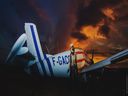
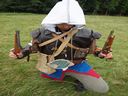
the last one! my ship??? A plan!
Strój Edwarda Kenway'a został samodzielnie uszyty przeze mnie na maszynie do szycia.
W skład stroju wchodzą:
-kaptur
-biała koszula z wyciętym kołnierzem i przedłużonymi rękawami (stylizowana na piracką)
-niebieska tunika obszyta lamówką z doszytymi białymi pasami zarówno z tyłu jak i z przodu
-spodnie (ze względu na koszty szycia kupione w ciucholandzie)
-brązowa kamizelka przerobiona ze skórzanej kurtki
-naramienniki wykonane z pozostałości po kurtce, ponabijane okrągłymi ćwiekami (wszyte rzepy mocujące)
-czarne przed ramienniki ze skóry z wszytymi rzepami do mocowania
-czerwona szarfa uszyta z materiału
-buty (przerobione stare kozaki koleżanki plus mokasyny na stopach)
-paski i pas na szable (zrobione ze starych pasków plus kieszonki uszyte ze skóry zamocowane na kleju)
-szable wycięte z PCV (posklejane i pomalowane plus doklejone kryształki)
-ukryte ostrza (zrobione z szyn na łożyskach kulkowych, mocowane na paskach)
Foto stroju w całości.
Zdjęcia zdjęciami, ale uważam, że strój w całości, najlepiej można podziwiać na filmie który powstał na 1 dniowym planie zdjęciowym w Krakowie.
[link]
Spodnie zostały uszyte na maszynie, w pas wszyłem gumkę, w szwach bocznych zastosowałem marszczenia / zakładki w celu lepszej układalności spodni oraz uzyskaniu cieni na sesji :)
Niebieski płaszcz z sztywnej welurowej tkaniny, z naszytymi pasami i dłuższym tyłem
Skórzaną kamizelkę wykonałem od podstaw wycinając i zszywając elementy. W celu usztywnienia kamizelki zastosowałem podszewkę z pianką ocieplającą
Naramienniki wykonane z dywaników samochodowych z wbitymi ćwiekami, na których za pomocą sprayu umieściłem logo nvidia

ho!
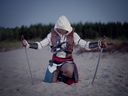
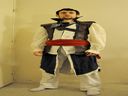
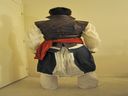
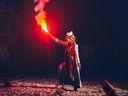
No to wrzucam swoje zgłoszenie.
Strój jaki i każda z jego ośmiu broni została wykonana przeze mnie. Jest złożony z wielu różnych materiałów (między innymi sztuczne skóry, lny, tkaniny naturalne, drewno, termoplastyczny materiał worbla, i masy plastyczne) za pomocą mniej lub bardziej konwencjonalnych technik (np. obijanie worbli skórą)
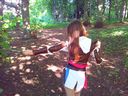
Postawiłem na zaprezentowanie tego stroju w całości wykorzystując potencjał jaki dają realia gry Assasin's Creed i przewodni motyw Black Flag. Na tydzień przed planem zdjęciowo/filmowym pojawiły się wzmianki o postaci Anny Bonny i postanowiłem dorzucić ją jako bonus do produkcji ;)
Do zdjęć dołączam więc film w którym postanowiliśmy ożywić Edwarda ( i anne) jak i zaprezentować strój i jego możliwości w najbardziej realistyczny sposób.
https://www.youtube.com/watch?feature=player_embedded&v=fX0LlFu7mlQ
Szczegóły produkcji stroju i filmu są zaprezentowane tutaj:
http://www.youtube.com/watch?v=TZzaz9n7XUE
(lub w wypadku osób znajdujących się na terenie Niemiec : https://vimeo.com/73463358)
To tyle, pozdrawiam i zapraszam do oglądania materiałów ;D
to i ja dodam coś od siebie :)
progresy część 1: bluzka i spodnie, materiał na bluzkę kupiłam biały i bluzkę po uszyciu zmoczyłam herbatą, żeby wyglądała na starą
progresy część 2: bolerko i naramienniki: niestety nie udało mi się kupiś skaju w korze brązowym, w hurtoni nie mieli go w żadnym ciemnym kolorze, więc kupiłam szarą, co w tm momencie jest dla mnie rzeczą dobrą, bo dzięki temu mogłam się pobawić farbami :)
progresy część 3:gorset i kaptur: wykrój na gorset powstał dzięki temu że modlka pozwoliła ubrać się w worek na śmieci i obkleić taśmą
progresy część 4: pas torebeczki i czarwony wiązany pas: została tutaj użyta ta sama skóra co w przypadku bolerka i naramienników, torebeczki są zapinane n azatrzski
progresy część 5: broń: powstała z papieru pianki montażowej i kleju na gorąco, niestety podczas ubuerania modelki zrezygnowałam z 3 pistoletów z powodu przeładowania stroju, nie chcałam zeby wyglądała jak parodia paladyna lewel milion :/
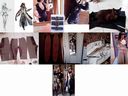
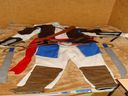
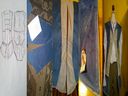
WIP picture.
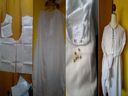
Some of the fabrics and patterns for my female Edward Kenway cosplay.
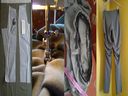
Patterns and fabrics of the hoodie.

The leather vest, half way done, and the red scarf.
The back of my leather vest, half way done.
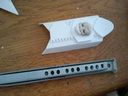
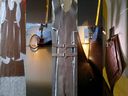
The hidden blades. The one on the left is finished. Made out of plastic.